In my everyday work, I have to use REST APIs quite extensively. Most of the time it’s the Jira or Confluence REST API, but here and there I also develop own little APIs using Flask.
At the moment I use Thunderclient, a VS Code extension which is a Rest Client for testing APIs. But since some features (more than 3 collections for example) require the paid pro version of Thunderclient and my requirements have increased, I started to think about an alternative Rest Client.
Additionally, I try to move towards a CLI Only style of work. Which is why I use Neovim with LazyVim installed for development in Python or writing documentation in Markdown. I then found, that LazyVim already brings a optional Rest Client extension which you can install Using :LazyExtras, called kulala.nvim.
Let’s take a look into how to install and use kulala.nvim for Rest API testing in Lazyvim.
Installation process:
Prequisites:
- you already have Neovim and Lazyvim Installed
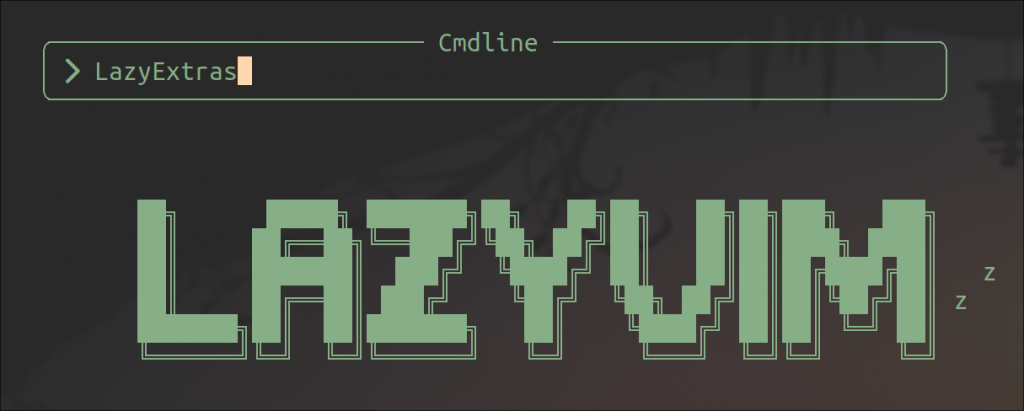
When started Neovim (with LazyVim), type :LazyExtras and press enter. Pressing colon should open the Cmdline Popup where you just type LazyExtras.
Then a Popup should appear, where you can select which predefined Lazyextras you like to install. Find the extra called util.rest:
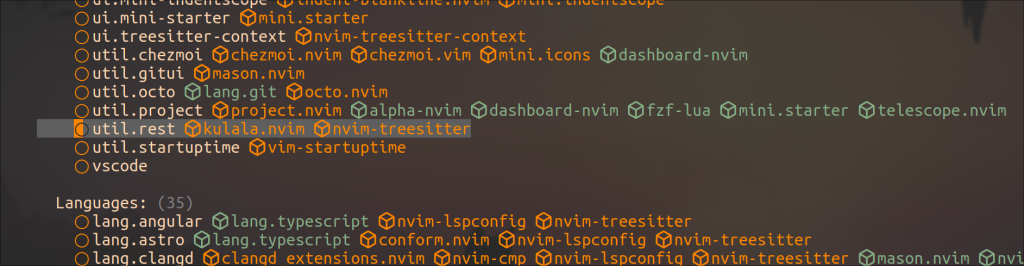
Then, just press x to install the extra. This already enables the extra. It shoould now appear at the top of the list under “Enabled Plugins”:

Now just restart Neovim to install and load the Plugin and you are done installing.
Configure Keymaps
The LazyVim docs show that there are some Keymaps predefined for Using kulala.nvim, however not all of those keymaps seem to work right away when installing the LazyExtra. You only see some of them, when pressing <leader>R:

In the Rest Extra documentation, you can find the Full spec of kulala.nvim. Somehow, not all the defined Keymaps are used. We can fix this by adding the configuration manually. Just create a .lua file under ~/.config/nvim/lua/pluginscalled kulala.nvim (filename doesn’t really matter) and provide the configuration. This will overwrite LazyVims defaults:
return {
  "mistweaverco/kulala.nvim",
  ft = "http",
  keys = {
    { "<leader>R", "", desc = "+Rest", ft = "http" },
    { "<leader>Rb", "<cmd>lua require('kulala').scratchpad()<cr>", desc = "Open scratchpad", ft = "http" },
    { "<leader>Rc", "<cmd>lua require('kulala').copy()<cr>", desc = "Copy as cURL", ft = "http" },
    { "<leader>RC", "<cmd>lua require('kulala').from_curl()<cr>", desc = "Paste from curl", ft = "http" },
    {
      "<leader>Rg",
      "<cmd>lua require('kulala').download_graphql_schema()<cr>",
      desc = "Download GraphQL schema",
      ft = "http",
    },
    { "<leader>Ri", "<cmd>lua require('kulala').inspect()<cr>", desc = "Inspect current request", ft = "http" },
    { "<leader>Rn", "<cmd>lua require('kulala').jump_next()<cr>", desc = "Jump to next request", ft = "http" },
    { "<leader>Rp", "<cmd>lua require('kulala').jump_prev()<cr>", desc = "Jump to previous request", ft = "http" },
    { "<leader>Rq", "<cmd>lua require('kulala').close()<cr>", desc = "Close window", ft = "http" },
    { "<leader>Rr", "<cmd>lua require('kulala').replay()<cr>", desc = "Replay the last request", ft = "http" },
    { "<leader>Rs", "<cmd>lua require('kulala').run()<cr>", desc = "Send the request", ft = "http" },
    { "<leader>RS", "<cmd>lua require('kulala').show_stats()<cr>", desc = "Show stats", ft = "http" },
    { "<leader>Rt", "<cmd>lua require('kulala').toggle_view()<cr>", desc = "Toggle headers/body", ft = "http" },
    { "<leader>Re", "<cmd>lua require('kulala').set_selected_env()<cr>", desc = "promt environments", ft = "http" },
  },
  opts = {},
}
Note, that I also added a keybind at the end. When pressing <leader>Re I want a telescope prompt to show up for selecting an Environment. I’ll come back to that later.
If we restart Neovim and press <leader>R again, we now have more keybinds available:

Usage of kulala.nvim
To use kulala.nvim it’s already enough to create an .http file, put in a request and send it. But for most of the time, you would at least have dev and production environment to run request against. We can also place configuration files for different environments and credentials.
To start off, I create three files:
- http-client.env.json
- http-client.private.env.json
- apitest.http
In http-client.env.json, we define the base URL of different Environments, for example:
{
  "dev": {
    "API_URL": "https://malew.atlassian.net"
  },
  "prod": {
    "API_URL": "https://malewprod.atlassian.net/"
  }
}
In this case, I use a Jira Cloud instance as an example. Now in our second File http-client.private.env.json we can define API keys for those environments. When using this in a git repository, you should have this file in your .gitignore.
{
  "dev": {
    "USERNAME": "myusername"
    "API_KEY": "d3v"
  },
  "prod": {
    "API_KEY": "pr0d"
  }
}
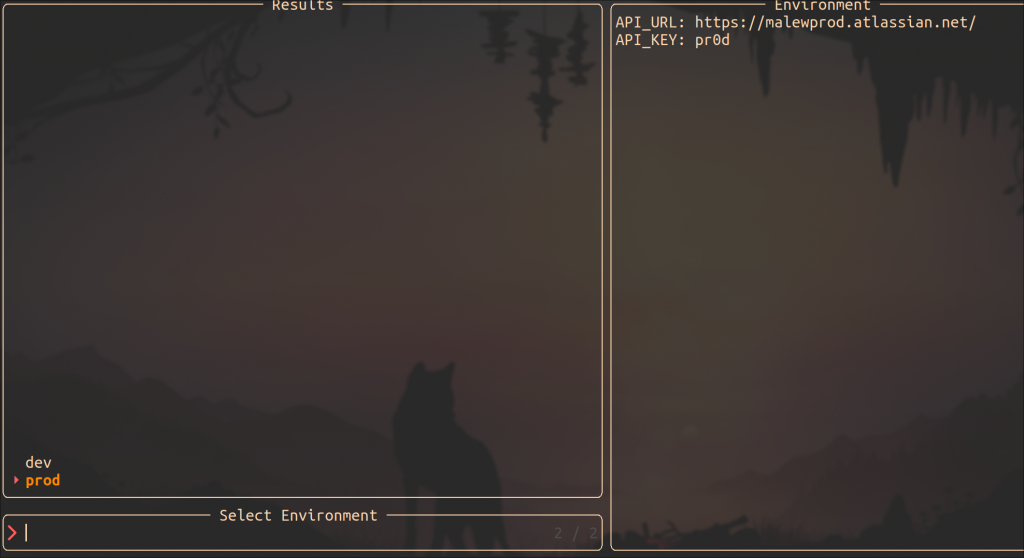
If you now use our created keybind <leader>Re you should be able to change the environment in a telescope prompt:
Note: If you store any Environmentvariables in your dotfiles for example .zshrc or .bashrc, kulala will access those variables first.
You have to be in an .http file to open this prompt! Otherwise, you won’t be able to use the keybind.
The last file we need is the .http file. This is where we define one or more request, we can then send.
GET {{API_URL}}/rest/api/latest/issue/TES-1?fields=summary
Accept: application/json
Authorization: Basic {{USERNAME}}:{{API_KEY}}

###

POST {{API_URL}}/rest/api/latest/issue
Content-Type: application/json
Authorization: Basic {{USERNAME}}:{{API_KEY}}

{
    "fields": {
        "summary": "thats a test",
        "project": {
            "key": "TES"
          },
        "issuetype": {
            "name": "Story"
          }
    }
}
Here we have two requests, a GET request, to get a Jira issue and a POST Request to create a Jira issue. The triple hashtags ### are required to separate both requests. When the cursor is on one of the Requests, you can press <leader>Rs to send the Request. In this case, we use basic auth with username and apikey. Kulala is able to automatically encode the username and key.
After you send the request, a second split window will pop up, showing the data that’s given back by the API. With <leader>Rt you can toggle to the header view of that request.
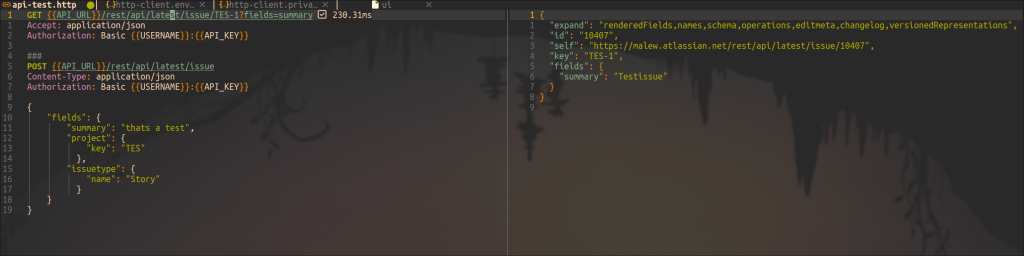
In the POST Request, we can see how to Provide JSON Data to the Request. In this case, the data is required to create a Jira Issue.
You can find the http file specification here. And if you are interested in different Authentication methods besides basic auth there is a documentation by kulala as well.
Conclusion
For my use Case, Kulala.nvim is a great tool for API testing. I love, that I dont need to leave Neovim / my console to run those requests. The use of Environment variables is great and easy to use for everyone with Linux know how.
A feature I would like to see in the future is a possibility to import or export Collections as JSON, so that you can send those to other people using tools like postman, httpie, bruno or thunderclient.
